Workshop Setup

This step will provision several AWS resources and the Dynatrace configuration needed for the workshop.
Let’s Begin
From the Cloud9 window, run these commands to start the provisioning process:
cd ~/modernize-workshop-setup/aws
./provisionAWSWorkshop.sh
The script output will look like this:
==========================================
Provisioning AWS workshop resources
Starting: Tue Jun 16 14:41:09 EDT 2020
==========================================
...
...
When it completes, it will look like this:
...
...
=============================================
Provisioning AWS workshop resources COMPLETE
End: Tue Jun 16 14:42:22 EDT 2020
=============================================
The script will run fast, but it will take about 1-2 minutes for the CloudFormation script to complete. You can monitor progress @ https://console.aws.amazon.com/cloudformation/home
Once the ec2 instances are running, it will take an additional 4-6 minutes for the easyTravel sample application to completely start, so please be patient.
What this script is doing
1 . AWS resources - using AWS CLI
- Add a KeyPair for the EC2 Instances called YOUR_LAST_NAME-dynatrace-modernize-workshop
2 . AWS resources - using a CloudFormation stack created by the AWS CLI
- Add a CloudFormation stack named YOUR_LAST_NAME-dynatrace-modernize-workshop
- Add a VPC named YOUR_LAST_NAME-dynatrace-modernize-workshop
- Add EC2 instance named: YOUR_LAST_NAME-workshop-ez with a new security group named security_group_workshop-ez
- At startup, it installs Docker and the EZ travel application
- At startup, it installed the OneAgent for your Dynatrace tenant
- Add EC2 instance named: YOUR_LAST_NAME-workshop-ez-docker with a new security group named security_group_workshop-ez-docker
- At startup, it installs Docker and the EZ travel application using the Docker-Compose implementation
- At startup, it installed the OneAgent for your Dynatrace tenant
3 . Configure Dynatrace using the Dynatrace API
- Set global Frequent Issue Detection settings to Off
- Adjust the Service Anomaly Detection global settings
- Add a custom Java sensor for the CheckDestination backend service
- Add Management Zones for ez-travel and ez-travel-docker
- Add modernize-workshop dashboard
- Add autoTagging rule for a tag called workshop-group.
- Add application for EasyTravelOrange and EasyTravelOrangeDocker
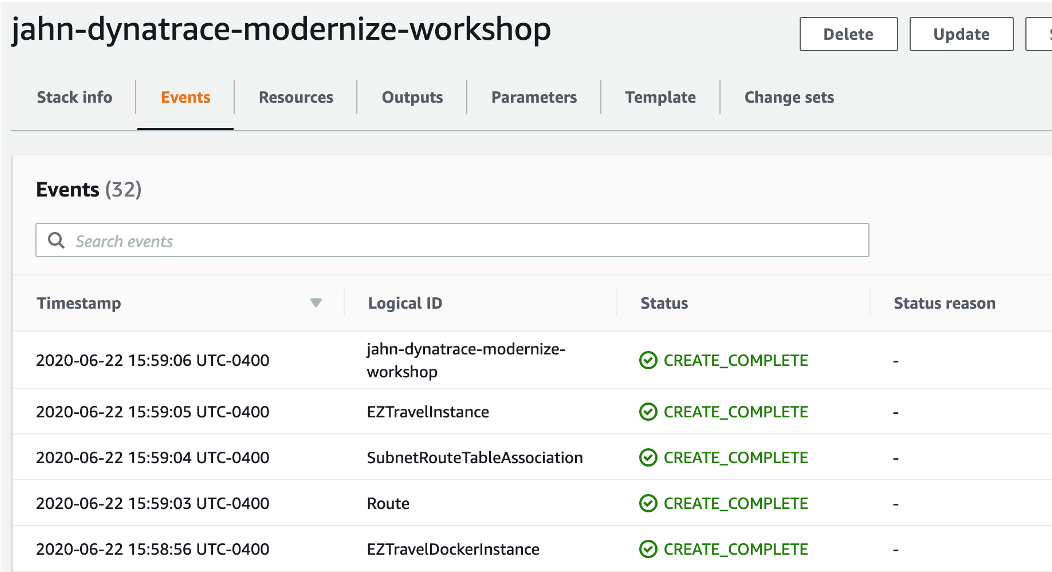
Review CloudFormation Output
As mentioned above, it may take a few minutes, but you can check the CloudFormation output to ensure that all the AWS resources were provisioned with no rollbacks. For example, the CloudFormation may rollback due to VPC limits being reached. In that scenario, delete one of the VPCs and retry the script. If you expand the events tab, you should see CREATE_COMPLETE for the resources as shown below.
Checklist
In this section, you should have completed the following:
✅ Used the AWS Cloud Shell and ran various UNIX commands
✅ Configured the AWS Monitoring Dynatrace Integration
✅ Captured environment and token info needed for automation scripts
✅ Provisioned workshop AWS resources
Next step
While you wait for the easyTravel application to start, you can move to the Why Dynatrace section to learn why Mystic Mysfits choose Dynatrace.